
Did you know that water damage hits over 14 million homes in the U.S. yearly? This costs homeowners an average of $3,000 to $6,000 to fix. If your sheetrock ceiling got damaged from a leak, don’t worry. With the right steps, you can fix it yourself. This guide will show you how to repair a water-damaged sheetrock ceiling. It covers finding and fixing the leak, removing the damaged drywall, and finishing the repair.
Key Takeaways
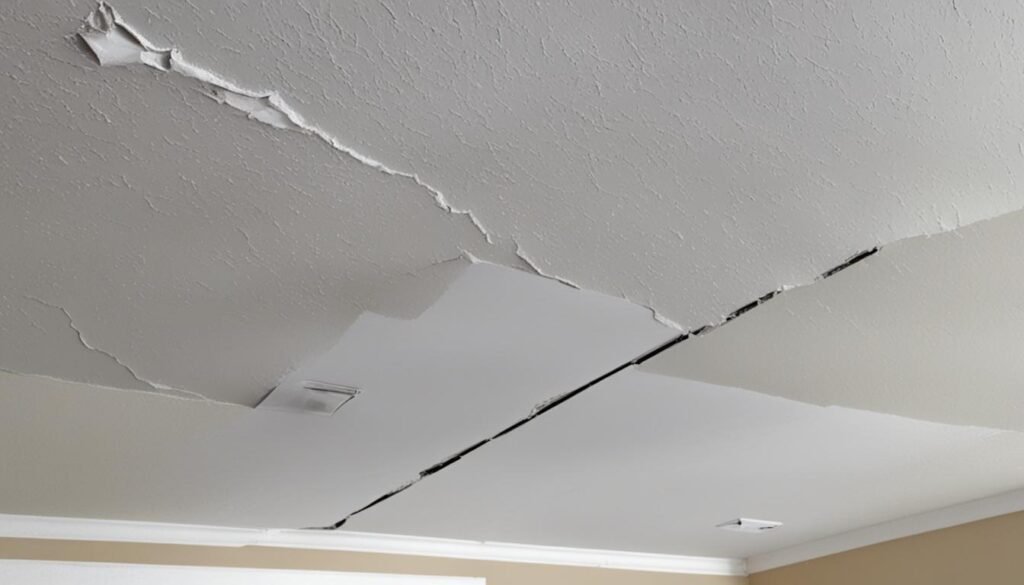
- Water damage can make sheetrock ceilings look bad or even cause them to collapse.
- First, find and stop the leak to start fixing the ceiling.
- It’s important to remove the damaged drywall and get the area ready before you start fixing it.
- Using a step-by-step guide can help you fix a water-damaged sheetrock ceiling well.
- Having the right tools and techniques is key for a repair that lasts and looks professional.
Identifying and Stopping the Water Leak
Before fixing a water-damaged sheetrock ceiling, find and fix the leak’s source. This can be tough because water can move far from where it entered and damage other areas. By finding and fixing the root cause, you can stop more damage and make sure the repair works well.
Common Sources of Ceiling Leaks
Many things can cause ceiling leaks. These include overflowing sinks, toilets, bathtubs, or showers, and faulty appliances. Leaky pipes, clogged gutters, and damaged or missing roof shingles can also be culprits. Using a moisture meter or placing tissue paper on pipes or ceiling joists can help find the leak’s source.
If the leak comes from the roof, check the shingles, chimney, and any pipes or vents for water damage. Simulating rainfall by spraying the roof with a hose can show where the leak is, even when it’s not raining.
| Common Causes of Ceiling Leaks | Identification Methods |
|---|---|
| Overflowing sinks, toilets, bathtubs, or showers | Visual inspection, moisture meter |
| Faulty appliance water supply or drain lines | Tracing water flow, moisture meter |
| Leaky pipes | Visual inspection, moisture meter |
| Clogged gutters | Visual inspection |
| Damaged or missing roof shingles | Visual inspection, simulated rainfall |
Identifying and fixing the water leak’s source is the first key step to repair your damaged sheetrock ceiling. This prevents further problems. Next, we’ll look at removing the damaged drywall and getting ready for the repair.
Removing Damaged Drywall and Preparing for Repair
After fixing the water leak, start by removing the damaged sheetrock. Use drop cloths or tarps to catch the drywall pieces, dust, and debris. If the wallboard is heavily water-damaged, it will sag or crumble easily. You should remove it completely.
If the drywall panels have water stains but are still intact, you might be able to fix them. Cut out the damaged part with a keyhole saw, making a square or rectangular shape for the patch. Always wear safety goggles and a dust mask to protect yourself.

After taking out the damaged drywall, get the area ready for repair. This means cleaning up water damage, fixing any structural problems, and making the surface smooth for new drywall. Doing this well ensures a repair that lasts and looks great.
By following these steps, you’re on your way to fixing your water-damaged ceiling. With care and attention, you can get a repair that looks professional and lasts long.
How to Repair Water Damaged Sheetrock Ceiling
Fixing a water-damaged sheetrock ceiling is doable as a DIY project if you have the right tools and know-how. It’s important to find the leak’s source and prepare the area well before starting. Let’s go through the steps to fix your ceiling and make your home look great again.
Measure and Cut the Replacement Drywall
First, measure the damaged area of your ceiling that needs fixing. Cut a new piece of drywall that’s 2 inches bigger on all sides than the hole. This makes sure it fits well and blends in nicely.
Apply Joint Compound and Insert the Patch
Put a thin layer of joint compound around the hole’s edge. Carefully place the drywall patch into the hole and press it down with a putty knife. Make sure the edges blend smoothly.
For holes 6 to 12 inches wide, use a stick and string to hold the patch in place. Spread a lot of joint compound or adhesive on the patch’s back, then secure it with the stick and string until it dries.
Sand, Prime, and Paint
After the compound dries, sand the area to smooth out any bumps or rough spots. Then, prime the patched area and paint it with a color that matches the ceiling. This makes the repair blend in perfectly.
| Step | Description |
|---|---|
| 1. Measure and Cut | Cut a drywall patch 2 inches larger than the hole in all directions. |
| 2. Apply Joint Compound | Spread a thin layer of joint compound around the perimeter of the hole. |
| 3. Insert the Patch | Place the patch into the hole and use a putty knife to work the edges into the compound. |
| 4. Secure Larger Patches | For holes 6-12 inches, use a stick and string to hold the patch in place as the adhesive dries. |
| 5. Sand and Finish | Sand the area lightly, then prime and paint to match the existing ceiling. |
By following these steps, you can fix a water-damaged sheetrock ceiling and make your home look great again. Always fix the leak first to avoid more damage. Take your time for a professional-looking result. With effort, you can refresh your ceiling and keep your home’s value up.

Conclusion
Fixing a water-damaged sheetrock ceiling is a detailed process. It starts with finding and stopping the leak, then removing the damaged drywall. Finally, you prepare the area for repair. This guide gives you step-by-step instructions to fix your ceiling efficiently.
If you’re unsure about fixing the water damage yourself, consider getting help from a professional. The team at FloodFixers has the skills and experience in drywall repair and home improvement. They can make sure your ceiling looks great and lasts long.
Addressing ceiling water damage and replacing drywall not only makes your home look better. It also keeps it safe and prevents future problems. With the right steps and care, your damaged ceiling can become a beautiful, smooth surface. This will improve your home’s look and value.
FAQ
What are the common sources of ceiling leaks?
How can I locate the source of the water leak?
How do I remove damaged drywall from a water-damaged ceiling?
How do I repair a water-damaged sheetrock ceiling?
Source Links
- https://www.mrhandyman.com/dallas/about-us/ask-a-pro/2022/november/how-to-patch-up-drywall-ceiling-water-damage-hol2/
- https://www.homedepot.com/c/ah/how-to-repair-a-water-damaged-ceiling/9ba683603be9fa5395fab90154a4f56d
- https://www.truevalue.com/diy-projects/maintenance-and-repair/water-damage-restoration-for-walls-and-ceilings/