
Did you know that over 2.5 million households in the United States face water damage each year? This includes electronic devices, like your beloved amplifier. If your amplifier got wet, don’t give up hope. With the right steps, you can fix and bring it back to life. This guide will show you how to restore your amplifier to its original condition.
Key Takeaways
- Water damage can be devastating to electronic devices like amplifiers, but with the right techniques, many can be successfully restored.
- The first steps after water exposure involve triage and thorough cleaning to prevent further damage.
- Disassembly, inspection, and component replacement may be necessary to fully repair a water-damaged amplifier.
- Patience, attention to detail, and the right tools and materials are key to successfully fixing a water-damaged amplifier.
- Preventative measures can help minimize the risk of future water damage to your audio gear.
Triaging and Cleaning Flood-Damaged Audio Gear
When your audio equipment gets wet, act fast to lessen damage and boost restoration chances. The steps to fix flood-damaged audio gear are detailed and crucial. They can greatly affect the outcome of saving your valuable amplifiers, speakers, and other audio parts.
First Steps After Water Exposure
First, wash your audio gear with clean water after it’s been wet. This step removes harmful residue and contaminants from sensitive parts. Use a hose, sink, or a bucket of clean water to quickly flush out the dirty liquid.
Next, dry your equipment fast. Start by gently drying surfaces with clean cloth or paper towels. This helps stop moisture damage right away. Then, use a water-displacing agent like WD-40 in tight spots and crevices to dry them out.
Detailed Cleaning Process
- Take apart the equipment safely to clean inside parts well.
- Use a soft-bristle brush and isopropyl alcohol to clean all surfaces, focusing on circuit boards and delicate parts.
- Dry each part with a hairdryer on a low, cool setting, checking for moisture.
- Look for corrosion or damage and replace any broken parts.
- Put the equipment back together, making sure everything fits right and connects well.
This detailed method helps you fix your flood-damaged audio gear. Act fast and carefully to save your amplifiers, speakers, and other audio parts. Remember, time is crucial for success.
“The key to successfully rescuing water-damaged audio gear is to act swiftly and follow a meticulous cleaning process. With the right techniques, you can often salvage your valuable equipment and get it back in working order.”
how to fix a water damaged amplifier
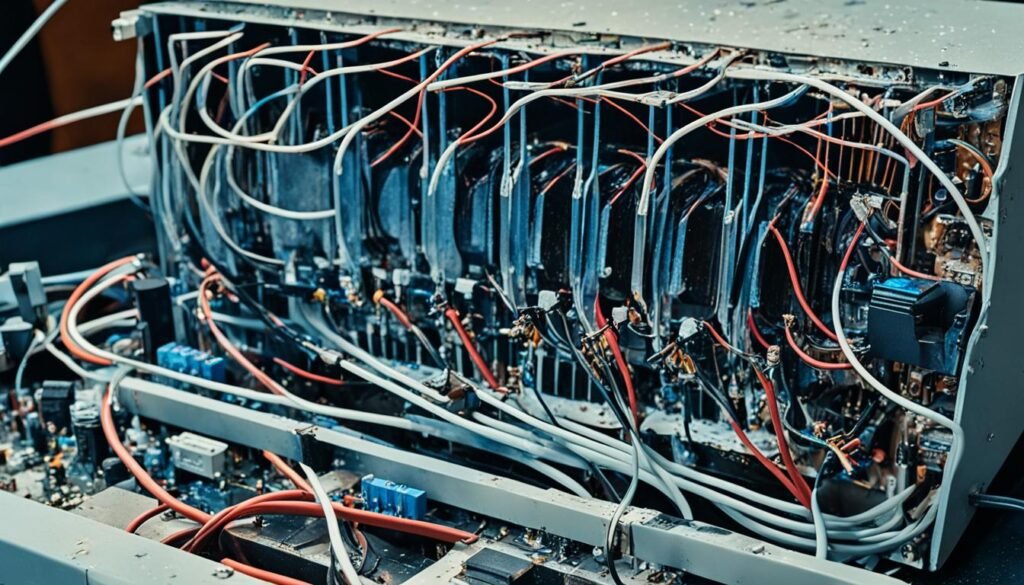
Disassembly and Inspection
To fix a water-soaked amplifier, start by unplugging it and letting any capacitors discharge. Then, take off the top cover, knobs, and other parts. Remove the power transformer and rear panel too.
Next, disconnect all wires and take out the PCB(s) and heat sinks. This careful step is key to fixing your amplifier.
Inspect each part for water damage like corrosion or physical harm. Check the circuit board closely for any damage from the water. This helps you see how bad the damage is and what repairs you need.
If your amp got wet, checking every part is even more important. Water can get into tiny spots, hurting many parts inside.
Quick and careful steps are crucial when rescuing a wet amplifier. By working methodically, you can dry out and fix your waterlogged amp.

“The secret to amplifier water damage restoration lies in the details. Thorough disassembly and meticulous inspection are the foundation for any successful water damaged amp repair project.”
After taking apart and checking your amp, you’re set for the next steps. We’ll cover cleaning to get your liquid damaged amplifier working again soon.
Conclusion
In this guide, you’ve learned how to fix water damage in your amplifier. You now know the steps to clean and repair it. This will help your audio equipment work like new again. Be patient, thorough, and careful to get the best results.
Whether it was a small spill or a big flood, you can fix it with the tips given. These skills will help you in the future. You’ll get to learn by doing and improve your troubleshooting abilities.
Your amplifier can be fixed with the right care and attention. This DIY project saves money and helps you understand your audio gear better. Take on the challenge and enjoy your amplifier’s great sound for many years.